一、新的组件生命周期钩子

React 的生命周期钩子允许开发者在组件实例化、完成渲染、属性、更新、销毁等不同阶段操作组件。这给我们的开发带来更多的灵活性;
但是,如果开发者对各个生命周期的理解错误,很容易造成对它的滥用,就会造成性能上的浪费等问题。
比如:componentWillMount 对组件进行 setState、dom 操作、添加事件监听、获取数据等。这些都是不安全的操作。
react16 对组件的生命周期做了优化,”移除”容易被大家误解的钩子,添加更加容易理解、安全的钩子。
“删除”了以下钩子(17 版本中将真的删除):
componentWillMount()
componentWillReceiveProps(nextProps, nextState)
componentWillUpdate()
新增了以下钩子:
static getDerivedStateFromProps(nextProps, prevState)
getSnapshotBeforeUpdate(prevProps, prevState)
componentDidCatch(error, info)
a. 如何理解 static getDerivedStateFromProps(nextProps, prevState)?
首先,需要对静态方法做一个理解。static 静态方法,在 es5 中怎么实现呢?
function Person() {}
Person.getCount = function () {}
以上就是 static 静态方法的原理。由于“this”只能获取属性是根据原型链,而静态方法不在原型链上,所以,在组件实例内无法通过 this 调用 static 方法,static 方法也无法根据”this”调用实例的其他方法。
就防止在 getDerivedStateFromProps 对组件实例的错误操作。
再次,getDerivedStateFromProps 用来做什么用呢?
当组件实例化、接收到新的 props 时,会调用该方法。方法返回一个对象,这个对象会被更新到组件的 state 上。如果返回空,那么不对 state 做更新。
1 | // 以下代码实现,更新name属性到state上; |
使用
这个生命周期函数是为了替代 componentWillReceiveProps 存在的,所以在你需要使用 componentWillReceiveProps 的时候,就可以考虑使用 getDerivedStateFromProps 来进行替代了。
两者的参数是不相同的,而 getDerivedStateFromProps 是一个静态函数,也就是这个函数不能通过 this 访问到 class 的属性,也并不推荐直接访问属性。而是应该通过参数提供的 nextProps 以及 prevState 来进行判断,根据新传入的 props 来映射到 state。
需要注意的是,如果 props 传入的内容不需要影响到你的 state,那么就需要返回一个 null,这个返回值是必须的,所以尽量将其写到函数的末尾。
1 | static getDerivedStateFromProps(nextProps, prevState) { |
b. 如何理解 getSnapshotBeforeUpdate(prevProps, prevState)?
首先,从字面来理解“snapshot”是快照的意思。在 dom 更新之前调用。返回的值将被传给 componentDidUpdate(prevProps, prevState, snaphot)。
这个会比较少用到,但对于处理比如数据更新后的滚动条的差异滚动,对用户体验,很有帮助。
c. 如何理解 componentDidCatch(error, info)?
以往,当组件发生错误(可以用 throw new Error 模拟)时,会导致整个 react 程序死掉,这对于程序的稳定性来说非常不好。
componentDidCatch 可以捕获子组件中任何一个错误,捕获到错误后可以对错误进行处理。
如果发生错误的组件的父组件没有设置 componentDidCatch 错误捕获,将继续递归父组件的父组件中的 componentDidCatch,找到则停止。
1 | // 简单的错误捕获 |
二、优化了哪些语法
1. ref 优化
ref 有很多作用,通过 ref 父组件可以调用子组件内的方法,配合ReactDOM.findDOMNode(ref) 可以获取到组件对应的 dom。ref 与 key 一样无法通过 this.props.ref 获取;
以前版本的 react,给子组件添加 ref=“inputName”,就可以通过 this.refs[‘inputName’]获取子组件实例。然后可以进行一些操作。
React16 中有两种创建 Ref 的方法:
1 | constructor () { |
1 | render () { |
那么,既然 ref 和 key 可以一样不能用 this.props 获取,有没有办法传给子组件呢?这样就可以实现在组件中调用子子组件(比如子组件中的 input)了。
答案是肯定的。
也有两种方法:
1 | render () { |
1 | // 通过React.forwardRef 传递 |
2. 将组件实例化到其他 dom 下,可以优化吗?
React 渲染时,默认是将节点渲染到父组件中,这样能满足我们大部分的需求,but,有这样的组件,比如 Dialog,在组件渲染时,需要能定义组件弹出的 dom 位置,如 Dialog 中的 appendToBody 为 true 时,渲染到 body 节点下。
以前我们的做法是,通过 ref 和 ReactDOM.findDomNode 获取 dom 在 dialog open 时通过 document.body.appendChild(dom),将 append 到 body 下,在 componentWillUnmount 时,document.body.removeChild(dom),移除没用的 dom。
这样来做就有点麻烦,需要 ref、ReactDOM 等。
React16 提供了一种优雅的方式 createPortal,Portals 提供了一种很好的将子节点渲染到父组件以外的 DOM 节点的方式。
createPortal,渲染子节点到目标节点,并返回元素。
我们知道 ReactDOM.render 也可以将子节点渲染到目标节点,区别是 ReactDOM.render 并没有元素,因此不作为 render 方法的 return
我直接贴 react 的 Demo。
1 | const modalRoot = document.body; |
3. 需要传递的多层的 props,可以优化吗?
在实际开发中,我们经常会碰到,一个值需要被传递到多层的子组件中,我们不得不通过 props 一层一层的传递。
react16 同样提供了优雅的方式。
React.createContext
三、性能方面的优化
1. React.Fragment
React 渲染时,要求 JSX 元素是 tree 结构,因为 JSX 原理还是调用 React.createElement(Component, attrs, [...children]),这样好理解。但这样在组件开发过程中,就有所限制,比如:Table Tr 组件,需要渲染同时多个 Tr,在以前我们就需要包一层<div>,造成了浪费。
react16 提供了Fragment,可以让我们渲染一个子元素列表,并且不在 DOM 中增加额外节点。
1 | render () { |
2. React.memo
用在函数组件的性能优化上,会对函数组件实现和 PureComponent 一样的功能,对 props 和 prevProps 做一次 shallowEqual 浅比较。
用法:
1 | React.memo((props) => { |
3.React.lazy & React.Suspense
实现 React 的 Code Spliting 对 React 代码进行拆包,有效的减少一次性加载太多代码的问题。
用法:
1 | const IconDemo = lazy(() => import('./icon')); |
四、hooks
我们知道,React 创建组件有 3 中方式【extends React.Component / PureComponent】、【React.createClass】,纯函数(无副作用,只接受参数,不对参数做任何处理)。
extends React.Component、React.createClass 创建的组件,拥有完成 react 声明周期、状态,可以开发较为复杂的组件。
而,纯函数组件,只能做渲染,绑定的属性都是通过 props 决定的。没有声明周期、状态的概念。如下:
1 | function UserInfo (props) { |
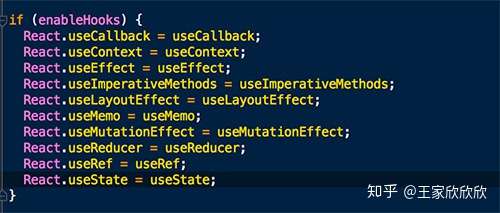
React v16.7.0-alpha 对函数组件做了以下扩展。
a. 针对没有 state 做的扩展
useState,可以将 state 添加到函数组件中,允许函数组件操作 state。
1 | import {useState} from 'react'; |
b. 针对没有生命周期钩子的扩展
useEffect,可以将 componentDidMount、componentDidUpdate、componentWillUnmount 钩子添加到函数组件中。
注意:区分有返回值,和没有返回值的情况
1 | import {useState, useEffect} from 'react'; |
c. one more thing
出于不至于滥用的目的,react 指定了一些 hooks 的使用规则。如命名、代码位置等。当然还很友好的除了代码检测 eslint 插件(eslint-plugin-react-hooks),可以检测开发者写的 hooks 是否合法。
规则如下:
- 在函数组件的顶层使用 hooks,不要在函数组件内的 for、if、匿名函数内使用 useState、useEffect,这将会报错。
- 关于 hooks 组件的使用,你可以在 react 组件内使用,也可以在 custom Hooks 内使用。
什么是自定义 hook(custom Hooks)呢?就是对 hook 的一个封装,我们可以封装特定功能的 hook,比如:用户状态的 hook、在线人数的 hook,这样在其他地方也可以使用。建议以 useXxxxx 的规范命名。
如:
1 | function useSetState (initial) { |