一、React 环境配置 安装脚手架工具
1 $ npm install -g create-react-app
创建项目工程
1
2
// demo是项目名称,不能有大写字母 $ create-react-app demo
安装浏览器调试工具
在 FireFox 中安装 React Developer Tools 和 Redux DevTools
React Developer Tools 能够在工具栏中很方便的看到页面的布局
Redux DevTools 能够追踪页面 state、action 等的变化
二、Redux Redux 作用 当项目越来越复杂时,组件越来越多的时候,组件之间数据的共享就成为了一个问题,那么 Redux 就是用来解决各个组件之间数据共享的问题的。
在项目中安装 Redux redux 的 GitHub 地址:https://github.com/reduxjs/redux
1
2
3
// 两种安装方法 $ npm install --save redux $ yarn add redux
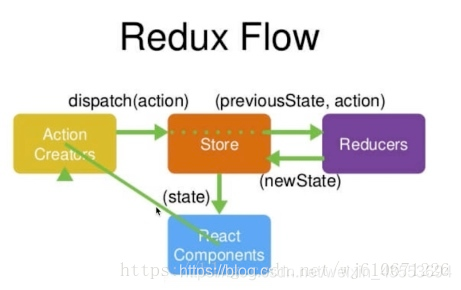
理解 Redux 工作流程
Store 就是项目中的数据仓库,但是数据是交给 Reducer 管理的
Store 向组件提供数据,组件订阅数据后,会根据状态的变化自动更新数据
组件要修改 Store 中的数据,需要创建一个 action 利用 dispatch 函数通知 Store
Store 把 action 和数据交给 Reducer,Reducer 根据 action 的类型来处理数据
Reducer 把处理好的数据返回给 Store
从 Store 中读取数据:派发 action 改变 Store 中的数据 action 是一个字符串,在 App 组件、reducer 文件中都使用了,容易引起难以调试的 Bug,也不利于后期维护。
1
2
3
4
5
6
7
8
9
10
11
12
13
14
15
16
17
18
19
20
21
22
23
24
25
26
27
28
29
30
31
32
33
34
35
36
37
38
39
40
41
42
43
44
45
46
47
48
49
50
51
52
53
54
55
56
57
58
59
60
61
62
63
64
65
66
67
68
69
70
71
72
73
74
75
76
77
78
79
80
81
82
83
84
85
86
87
// App组件 import React, { Component } from 'react'; import store from './store'; import { changeInputValue } from './store/actionCreators'; class App extends Component { constructor(props) { super(props); this.state = store.getState(); this.handleChangeInput = this.handleChangeInput.bind(this); this.handleStoreChange = this.handleStoreChange.bind(this); store.subscribe(this.handleStoreChange); } render() { return ( <div> <input placeholder="请输入信息" style={{width: "200px", height: '40px', border: '1px solid red'}} value={this.state.inputValue} onChange={this.handleChangeInput} /> </div> ); } handleChangeInput (e) { store.dispatch(changeInputValue(e.target.value)); } handleStoreChange () { this.setState(store.getState()); } } export default App; ------------------------------ // actionTypes.js 管理action类型 export const CHANGE_INPUT_VALUE = 'change_input_value'; ------------------------------ // actionCreators.js 管理action的创建 import { CHANGE_INPUT_VALUE } from './actionTypes'; export const changeInputValue = (value) => ({ type: CHANGE_INPUT_VALUE, value: value }) ------------------------------ // reducer.js import { CHANGE_INPUT_VALUE } from './actionTypes'; const defaultState = { inputValue: 'zhangsan' } export default (state = defaultState, action) => { if (action.type === CHANGE_INPUT_VALUE) { const newState = JSON.parse(JSON.stringify(state)); newState.inputValue = action.value; return newState; } return state; } ------------------------------ // store/index.js import { createStore } from 'redux'; import reducer from './reducer'; const store = createStore( reducer, window.__REDUX_DEVTOOLS_EXTENSION__ && window.__REDUX_DEVTOOLS_EXTENSION__() ); export default store;
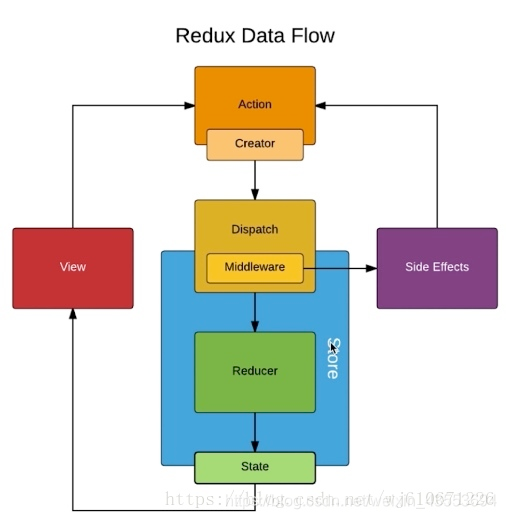
三、Redux-Thunk Redux-Thunk 的作用 Redux-Thunk是 Redux 的中间件(并不是 React 的中间件 ),用来将组件异步获取数据的操作封装到 action 中去,以此来减少组件中复杂的异步操作。
安装以及配置 1 2 $ yarn add redux-thunk $ npm install --save redux-thunk
使用 Redux-Thunk 之后的数据流程
实际上变化就在 Dispatch 中,使用 Redux-Thunk 之后 action 不仅可以返回对象,还可以返回函数,然后将异步操作代码放在 action 中了。
代码演示 这里采用从服务端获取数据展示一个 ul 列表
使用 Redux-Thunk 之后的代码以及配置
1 2 3 4 5 6 7 8 9 10 11 12 13 14 15 16 17 18 19 20 21 22 23 24 25 26 27 28 29 30 31 32 33 34 35 36 37 38 39 40 41 42 43 44 45 46 47 48 49 50 51 52 53 54 55 56 57 58 59 60 61 62 63 64 65 66 67 68 69 70 71 72 73 74 75 76 77 78 79 80 81 82 83 84 85 86 87 88 89 90 91 92 93 94 95 96 97 98 99 // App.js import React, { Component } from 'react'; import store from './store'; import { getListDataAction } from './store/actionCreators'; class App extends Component { constructor(props) { super(props); this.state = store.getState(); this.handleStoreChange = this.handleStoreChange.bind(this); store.subscribe(this.handleStoreChange); } render() { return ( <div> <ul> {this.state.list.map((item, index) => { return <li key={index}>{item}</li> })} </ul> </div> ); } componentDidMount() { // 着重变化的代码 store.dispatch(getListDataAction()) } handleStoreChange () { this.setState(store.getState()); } } export default App; ----------------------- // actionCreators.js import { GET_LIST_DATA } from './actionTypes'; import axios from 'axios'; export const getListData = (data) => ({ type: GET_LIST_DATA, value: data }) // action 返回一个函数,异步操作在这里进行 export const getListDataAction = () => { return (dispatch) => { axios.get('/list.json').then((res) => { if (res.data) { dispatch(getListData(res.data)); } }).catch((e) => { console.log(e); }) } } ----------------------- // store.js import { createStore, applyMiddleware, compose } from 'redux'; import thunk from 'redux-thunk'; import reducer from './reducer'; const composeEnhancers = window.__REDUX_DEVTOOLS_EXTENSION_COMPOSE__ ? window.__REDUX_DEVTOOLS_EXTENSION_COMPOSE__({}) : compose; const enhancer = composeEnhancers( applyMiddleware(thunk) ); const store = createStore( reducer, enhancer ); export default store; ----------------------- // reducer.js无变化 import { GET_LIST_DATA } from './actionTypes'; const defaultState = { list: [] } export default (state = defaultState, action) => { if (action.type === GET_LIST_DATA) { const newState = JSON.parse(JSON.stringify(state)); newState.list = action.value; console.log(action); return newState; } return state; }
结果:
四、Redux-saga 作用 redux-saga 同样是用来拆分组件异步代码的中间件,它和 Redux-Thunk 的区别就是将异步代码的操作放到一个单独的文件中去管理。
安装 1 2 $ npm install --save redux-saga $ yarn add redux-saga
代码演示 这里采用上面的例子,同样从服务器获取数据展示在 ul 列表中。
1 2 3 4 5 6 7 8 9 10 11 12 13 14 15 16 17 18 19 20 21 22 23 24 25 26 27 28 29 30 31 32 33 34 35 36 37 38 39 40 41 42 43 44 45 46 47 48 49 50 51 52 53 54 55 56 57 58 59 60 61 62 63 64 65 66 67 68 69 70 71 72 73 74 75 76 77 78 79 80 81 82 83 84 85 86 87 88 89 90 91 92 93 94 95 96 97 98 99 100 101 102 103 104 105 106 107 108 109 110 111 112 113 114 115 116 117 118 119 // App.js import React, { Component } from 'react'; import store from './store'; import { getListDataSagas } from './store/actionCreators'; class App extends Component { constructor(props) { super(props); this.state = store.getState(); this.handleStoreChange = this.handleStoreChange.bind(this); store.subscribe(this.handleStoreChange); } render() { return ( <div> <ul> {this.state.list.map((item, index) => { return <li key={index}>{item}</li> })} </ul> </div> ); } componentDidMount() { store.dispatch(getListDataSagas()); } handleStoreChange () { this.setState(store.getState()); } } export default App; ------------------------ // actionTypes.js export const GET_LIST_DATA = 'get_list_data'; export const GET_LIST_DATA_SAGAS = 'get_list_data_sagas'; ------------------------ // actionCreators.js import { GET_LIST_DATA, GET_LIST_DATA_SAGAS } from './actionTypes'; export const getListData = (data) => ({ type: GET_LIST_DATA, value: data }) // 这里创建了一个sagas中需要的action export const getListDataSagas = () => ({ type: GET_LIST_DATA_SAGAS, }) ------------------------ // reducer.js import { GET_LIST_DATA } from './actionTypes'; const defaultState = { list: [] } export default (state = defaultState, action) => { if (action.type === GET_LIST_DATA) { const newState = JSON.parse(JSON.stringify(state)); newState.list = action.value; console.log(action); return newState; } return state; } ------------------------ // store.js import { createStore, applyMiddleware, compose } from 'redux'; import reducer from './reducer'; import createSagaMiddleware from 'redux-saga'; // 新创建的sagas.js文件用来管理异步操作的代码 import sagas from './sagas'; const sagaMiddleware = createSagaMiddleware(); const composeEnhancers = window.__REDUX_DEVTOOLS_EXTENSION_COMPOSE__ ? window.__REDUX_DEVTOOLS_EXTENSION_COMPOSE__({}) : compose; const enhancer = composeEnhancers( applyMiddleware(sagaMiddleware) ); const store = createStore( reducer, enhancer ); sagaMiddleware.run(sagas); export default store; ------------------------ // sagas.js 单独管理异步操作的文件 import { put, takeEvery } from 'redux-saga/effects'; import { GET_LIST_DATA_SAGAS } from './actionTypes'; import axios from 'axios'; import { getListData } from './actionCreators'; function* mySaga() { // 这句代码意思是:当接收到一个名叫GET_LIST_DATA_SAGAS的action的时候 //会去调用getDataFromServer方法 yield takeEvery(GET_LIST_DATA_SAGAS, getDataFromServer); } // 获取数据的异步操作 function* getDataFromServer() { try { const res = yield axios.get('/list.json'); yield put(getListData(res.data)); } catch (e) { console.log('请求错误'); } } export default mySaga;
五、React-Redux 作用 React-Redux 的作用是为了在项目中使用 Redux 更加方便。
安装 1 2 $ npm install --save react-redux $ yarn add react-redux
代码演示 代码演示的例子是改变 input 输入框中的内容
1 2 3 4 5 6 7 8 9 10 11 12 13 14 15 16 17 18 19 20 21 22 23 24 25 26 27 28 29 30 31 32 33 34 35 36 37 38 39 40 41 42 43 44 45 46 47 48 49 50 51 52 53 54 55 56 57 58 59 60 61 62 63 64 65 66 67 68 69 70 71 72 73 74 75 76 77 78 79 80 // index.js 项目的入口文件 import React from 'react'; import ReactDOM from 'react-dom'; import App from './App'; import { Provider } from 'react-redux'; import store from './store'; const AppRoot = ( // 重点把store提供给每一个组件 <Provider store={store}> <App></App> </Provider> ); ReactDOM.render(AppRoot, document.getElementById('root')); ------------------------ // actionTypes.js export const INPUT_CHANGE = 'input_change'; ------------------------ // actionCreators.js import { INPUT_CHANGE } from './actionTypes'; export const inputChange = (data) => ({ type: INPUT_CHANGE, value: data }) ------------------------ // reducer.js import { INPUT_CHANGE } from './actionTypes'; const defaultState = { inputValue: '' } export default (state = defaultState, action) => { if (action.type === INPUT_CHANGE) { const newState = JSON.parse(JSON.stringify(state)); newState.inputValue = action.value; return newState; } return state; } ------------------------ // App.js import React, { Component } from 'react'; import { inputChange } from './store/actionCreators'; import { connect } from 'react-redux'; class App extends Component { render() { return ( <div> <input placeholder="请输入信息" style={{width: "200px", height: '40px', border: '1px solid red'}} value={this.props.inputValue} onChange={this.props.handleChangeInput} /> </div> ); } } // 将store中存储的数据映射到当前组件的props中 const mapStateToProps = (state) => { return { inputValue: state.inputValue } } const mapDispatchToProps = (dispatch) => { return { handleChangeInput (e) { dispatch(inputChange(e.target.value)); } } } // 利用connect将组件和store连接(连接规则mapStateToProps、mapDispatchToProps) export default connect(mapStateToProps, mapDispatchToProps)(App);
react 推崇的是组件化开发 下面就是一个有两个组件的 demo 演示基本骨架的搭建。
六、总结
Redux: 就是用来管理项目中状态或者数据的
Redux-Thunk: Redux 的中间件,用来将异步操作的代码拆分到 action 中去的
Redux-Sagas: Redux 的中间件,用来将异步操作的代码拆分到单独的文件中管理
React-Redux: 更能方便的管理和使用 Redux